Hacking into an old NES controller
::Update >> I wrote this stuff a long time ago and now it may sound really
stupid <<
This little tutorialette assumes that you know a little about TTL logic (the
0 and +5 volt stuff). Also you’re probably gonna need some kind of microcontroller
to do this stuff… which is easy… go buy any Basic Stamp 2 and then
read this.
I’m awful at explaining stuff but here goes:
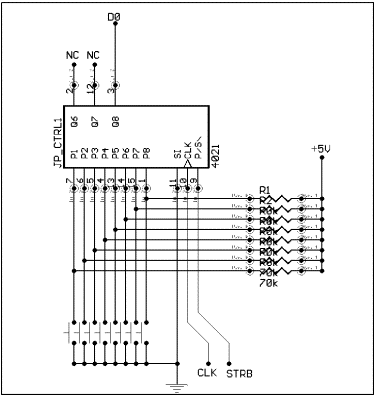
Here is the schematic of a NES controller:
And here’s the end on the plug that you plug into the NES console:
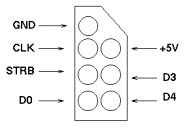
GND: Controller ground
CLK: Clock Input
STRB: Strobe Input
D0: Button Output
+5V: Controller power
D3: Not Used
D4: Not Used
You can see where D0, GND (Ground), CLK (Clock), STRB (Strobe), and +5V are
on both pictures.
D3 and D4 (on the plug) are not used with the NES controller; the NES console
uses these with the zapper and some other crreaaaaapp.
Here’s what happens:
First you have to apply 5 Volts to the controller to power its circuit. So hook
up the +5V hole on the plug to 5 volts and the GND hole to ground.
See those 8 buttons at the bottom of the schematic? Those are the 8 buttons
on the NES controller…YES!!! … The pushbuttons are, from left to
right: Right, Left, Down, Up, Start, Select, B and A. That chip thingy is called
an 8-bit shift register (I can’t back that up).
When a button isn’t pressed, the buttons corresponding pin on the chip
(P1 – P8) sees 5V. When you push a button, it makes 0 volts appear on
its corresponding pin. You can see on the schematic how pushing the button ties
the pin to ground.
When you raise and lower STRB (the strobe signal), it takes all the voltage
levels on the chips pins (P1 – P8) and stores them in the chip’s
register. For instance, if you were holding down the Up button and the B button
and sent a STRB signal, this byte would be stored in the chip’s register
(P1 – P8): 11101101
Now so far we’ve powered up the chip and sent a STRB signal to store the
buttons pressed into the controller’s chip.
Now we need to retrieve that byte … a lot. We will now shift this byte
out of the controller one bit at a time. Each bit will show up on D0 (on the
controller plug).
Every time you raise and lower the CLK(clock), the byte is shifted out by one
bit starting with the bit stored on P8 and ending with the bit stored on P1.
The first bit appears as soon as you send the strobesignal… so you only
have to raise and lower CLK7 times to get the whole byte.
GET IT????
I’ll recap:
1. Power up chip with 5V and ground
2. Send strobesignal (Raise and Lower STRB) to store status of buttons into
chip. The value of P8 (‘0’ if the A button was pressed, ‘1’
if not) is now present on D0.
3. Store the value of D0 into your microcontroller or whatever you’re
using.
4. Send clocksignal (Raise and Lower CLK) to shift the register by one bit and
make P7 (the B button) show up on D0.
5. Store the value of D0 (now the value of the B button).
6. Repeat steps 4 and 5 six more times so that you have shifted and stored the
whole byte.
7. Collect underpants.
Now you have the whole byte. Now you can use it for evil. Of course to make
the thing usable, you will have to repeat steps 2 through 6 like a bajillion
times a second so your uController will catch each button press instantly.
Hope that made sense at all. If not, go check out the camping section of my
webpage!
Oh yeah I got the pictures and a bunch of info from this one dude’s webpage…
Tennessee Carmel-Veilleux
Mad props. Cool name